 How I cherish my morning walks! A friend and I meet around 8 am for a walkabout (so far just on nice days) and does it ever make a difference in my day. I am not by nature a morning person and I often can barely put words together when we start out but by the time we return we have walked and talked for 45 minutes to an hour and it seems like no time at all. I've tried to motivate myself for a daily walk for years but for me having a walking partner is essential! The other day I took my camera along and took pictures in some of the gardens along the way and then took time for some in my own. Fodder for future artwork. Here is one to illustrate what terrific inspiration can be found in our everyday world.
I have also been busy following up on some leads that have been thrown my way over the past few weeks. Thank you friend for looking out for me. As a result I now have a series of watercolours in the Virtual Art Market (V.A.M.) gallery, 77 Bridge St. in Carleton Place. It isn't open Sundays and Mondays and opens at 11 on other days but seems to be doing a great job of marketing local artists. You can preview some of these painting by following my link to galleries and checking out the watercolour folder.
I have also received word that son #2 will be visiting next weekend and the t-shirt quilt that I introduced in a previous blog is for him. So, I'm making a concerted effort to get it as far ahead as possible before his arrival. Through the blog, I will document my aha's for any of you that may want to attempt a t-shirt quilt in the future.
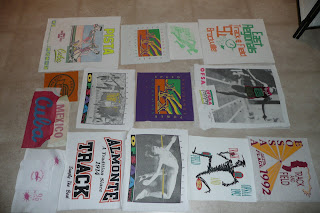
As previously noted, the quilt started with the sorting and washing of a bag of T-shirts saved from my sons' public and high school days. I was hesitant to proceed after all these years as my sons are well past that era but I have been assured that they would love these as a memento. Then I used a rotary cutter and a small mat that would fit inside the t-shirt to cut the logo from the shirt. I was careful to leave at least an inch or two inches of fabric around the logo for future size adjustments.
 Then, I took each of the logos and ironed on tricot interfacing. I chose a fusible tricot knit,a very light weight interfacing, as it left the t-shirt material soft. By turning the stretch in the opposite direction to the greatest stretch in the t-shirt it provides stability and minimized stretch.


Then I joined the strips to form the top. Even though I measured carefully, there were slight variations in the lengths of the strips so, I stitched them together so that one side (in this case the bottom) of the piece was even and all adjustments would occur on the other side (the top).
I did this because I determined that in a couple of strips I could open seams and make logos shorter, bringing the strip in line with its neighbours. In other cases, I made the cross framing strip wider or narrower as required. The quilt will have logos on both sides, so there will be an outside border added to bring this side of the quilt in alignment with the other side which I am sure will not measure the same!

Because I had selected a fabric where joins are not obvious, this adjustment does not jump out at you.

The top (or back) is finished!


Love your tutorial. The hints for using tshirt fabric are great.It is so difficult to sew stretch fabrics to wovens. Love the finished piece, it will be much treasured.
ReplyDelete