About Me

My photo
Calgary, Alberta, Canada
Life and the creative process are about the journey, not the destination. I love working with colour and texture and can get totally 'lost' in the creative process. Variety keeps my creative juices flowing. We are currently traveling full time in a 40' motorhome and bouncing between visits with a son in Albuquerque NM and a son, daughter-in-law and granddaughter in Calgary AB. In between we are busy exploring this great continent on which we live. It's a challenge working from my mobile studio but I am using our travel time to learn new skills and refine existing ones.

Saturday, August 28, 2010

The Joy of Networking

2008 Revisited: Retirement Angst
Check out the link to Quiltersmuse.com for a posting re one of my quilts with 'words' or writing on it (August 28th posting).  I have been catching up on past postings on the quiltart digest and noticed a call for ideas about how people use words on their work and thought of this piece '2008 Revisited: Retirement Angst'.  It hasn't been posted anywhere yet and this is just a teaser shot as I would like to exhibit it somewhere before I post the full piece.  In this piece I used both free motion stitching and the capability of my machine to program words. The piece comments on the drastic drop of the stockmarket in the year 2008 and some of my thoughts/turmoil about having been forced to reset my retirement plans to a date earlier than originally planned.  Any ideas regarding a show where this piece might be welcomed?

I'm working ahead on my Leah Day sample file and have completed the first 27 plus the 'basics' that Leah does not include in the series as she feels they are overworked.  More to come on this later.

Thursday, August 26, 2010

My Mobile Studio

As a follow-up to all the postings on Dale Ann Potter's FB page about her dream of traveling by RV and teaching as she goes, I decided not to delay any longer with this posting.  It's been planned for a while but I thought I should wait until everything was tidy!  This may be a bit of a ramble and I'll try to group info but here goes!

We have been traveling full-time in our motor home since January 2009 and one of the conditions was that I would not have to stop working on my artwork, including fibre art.  Long before we purchased our motor home we had both individually made up a list of needs (non-negotiable) and wants and then discussed how we would achieve as much as possible from these lists.  My non-negotiable included a kitchen with some counter space and storage and work area for my art.  Taking my sewing machine with me was a given!  When we actually made our purchase we were on holiday with no expectation of finding 'the one' but it was meant to be and we made it work.  My husband specified motor home not 5th wheel, and diesel not gas, and I'm glad now that he did.  When traveling in an RV weight and weight distribution is always a concern and diesel gives more lug power.  We periodically drive over a scale, weighing each wheel, to check that we have not made an inappropriate shift of weight inside the coach or storage. Interesting point we discovered this year, we travelled for a distance this year with a couple with the identical coach but theirs was much more lightly loaded and our fuel consumption wasn't much different.
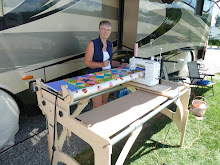
Sewing Table
I purchased a Sewezi table for my machine in advance and again it was a good move.  It is stable and folds down for easy storage when traveling - sometimes in the car we pull, sometimes on the bed depending on how much I anticipate using it in the immediate future.  I currently have it set up in the bedroom at the foot of the bed facing a window which gives me reasonable light. 

Dual Purpose Bed!
I use the bed to spread out the tools and work in progress so that it is easily accessible.  I do have to gather it up at night but at least I have the use of this space during the daytime.  When I work on larger pieces I will T to the table in the eating area to provide additional surface. 

Outside studio when required!
If you visit our travel blog  you may stumble on a picture of me working under the awning outside the coach (Casa Grande winter 2009) or more recently with my quilt frame (retrieved from storage) her in Cochrane.  When I do this I set up folding table that we carry to provide work space.

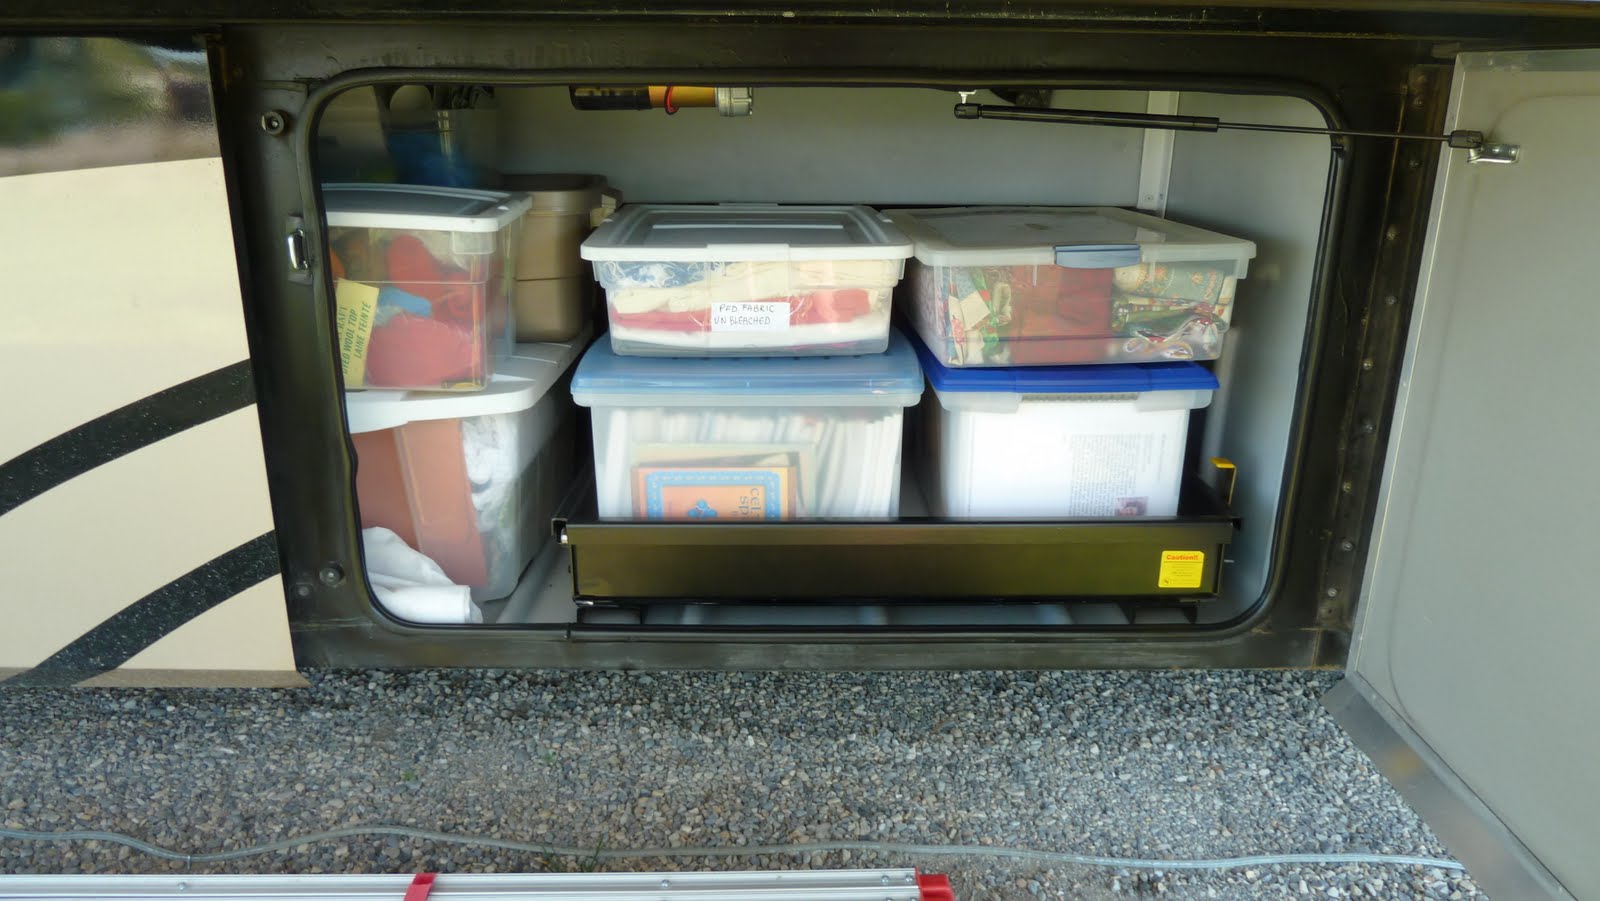
When we are 'touring' I tend to work on had projects that I have prepared in advance or on computer preparation for future projects.  I gather everything I need into ziplock bags, including the right needles and a small pair of scissors or other tools that are required if duplicates are available.  I store a number of these bags in a large UFO bin in the storage compartment below and only keep the current ones on hand.  My stash, yarn, embellishments etc. are in labeled bins in one of the storage bays below. 

Books, embellishments, yarn, fabric, and ???
We are fortunate that one of the bays has a pullout tray and that was dedicated for my 'studio'.  DH has been quite supportive!  A few books ride topside but I select the ones I want each year from the storage locker and limit myself to two bins.  I shipped the most pertinent ones west when we moved.  The rest are in storage back east and will be revisited when we go back that way.  We decided not to move everything until we 'come off the road' as we purchased a 40' cargo container, had the interior spray- foamed to reduce condensation and packed it with what little furniture we thought we might use in the future, family memorabilia, dishes etc.

Sewing Machine, embellisher, embroidery unit and ????
As for storage, the unit we chose has lots of cupboards.  In the first six months we had to rearrange contents a couple of times to balance weight but have more or less settled on an arrangement that works.   My sewing machine and embellisher sit in the bottom of a closet. 

Sewing and other embellishments and tools
I have forgone a washer/dryer in favor of storing two upright plastic drawer units in the space (1) findings and small sewing tools 2) craft/art tools and supplies.  Because the closet nearby was not full used for clothes, I was able to add a 3)rd unit with mainly art supplies, brushes etc.  Another cupboard has my thread, paint etc. in smaller drawer units and art boxes.  I've been careful to make sure anything that might be affected with temperature change is inside the coach.
Gave up closet space for art
Yet another cupboard


In the front of the coach, large sheets of paper and a large cutting board are lodge in the space behind the pull out couch.  We removed a loveseat on the opposite side (not terribly comfortable even though it was leather and DH constructed a desk from prefab cupboard units from Home Depot and a piece of MDF board topped with a piece of plexiglass.  The couch is in storage if the desk is a problem when we decide to sell the coach. 

DH's Handiwork
The desk has a printer/scanner on a pull out tray and storage for files, small projects, map books, etc.  It works as my computer space and I keep some stacked drawers on top with small sewing tool, pens etc. 

All my marking/small sewing tools
Everything sits on no skid stuff so that it doesn't move when we are traveling and the draws are turned to the wall so they don't pop out.  DH has a table cover that fit over the steering wheel and makes a computer space for him.  It works because he is mainly surfing RV sites and reading e-mail while I often have reference material nearby.
DH is happy here!

All in all it works for us.  Part of our travel experience ties in with my interest in genealogy so I also have some related materials stashed in bins down below and use a computer program for what I have managed to get recorded.  This is a work in progress but the geo-tracking component makes it easy to check and see if we should check local resources for more info as we travel.

I'm sure this post will generate more questions but it will maybe provide a basis for discussion.  What one needs to take with them is a very personal thing and as I 'garage saled', dealt with antique dealers, sold via word of mouth and sorted in preparation for this adventure, it became very obvious to me what was important to me. ' Things I couldn't part with on the first pass (year one) had moved to the not so important list in the second year and so on.  We were four years in this preparation but then we had been family 'archivists' and 'curators' all our married lives.  The benefit/cost of having lived in a large farm house for many years.  Once it was determined that no-one in the family was willing/able to take on the rolls, we started seriously searching for new homes for things, always mindful of our mantra 'Is it part of our life today, do I see it as part of my life tomorrow, can it be easily replaced if I change my mind.'  With both of us coming from families that have treasured family memorabilia and always re-used, recycled as much as possible, the experience of purging was freeing.  Check out a previous blog posting.

Tuesday, August 24, 2010

More Samples

19 down and 41 more ready to go!
Over the weekend I continued to work on samples until I ran out of suitable fabric - plain enough for the stitching to show but not totally plain.  My machine was cantankerous, making new noises and not making perfect stitches so I was glad that I had booked a visit to the service man Gil at Rumpled Quilt Skins in Okotoks.  Not next door but this store comes highly recommended by a friend back in Ottawa.  What a banquet of quilts to view and fabric, books and tools to explore!  They really had some pieces that got me anxious to get my embroidery unit working!  The visit yesterday did not disappoint and I found out that, in addition to the usual accumulation of lint (in spite of my frequent cleaning), somewhere along the line there had not been enough lubricant used on my machine - or all the dry climates I have been in over the last two years have taken their toll.  On the way back, while pursuing other errands, I located some inexpensive fabric that should do just fine for samples so I was back in business today.

It took a chunk of time today but I now have 41 quilt sandwiches prepared ready to stitch.  I'm much more likely to sit down for a short period of time if I don't have to start from scratch and make the sandwich.  Now to spend some time researching new fillers so that my reminder cards are ready to roll also.  Then tomorrow I can get back to stitching for a while.  I'm actually enjoying this exploration - not as boring as I thought it would be.  The next series will be an exploration of some new surface design techniques but that will have to wait until this series is completed.  I hope to actually get working on some 'work' along the way as well.  Hope hubby doesn't decide to hit the road too soon!

Friday, August 20, 2010

Thanks Leah Day!

A Great Start!  Thanks Leah!

I'm finally back at my sewing machine.  Thanks to surgery and physiotherapy, the wrist is working fairly well, although my coordination is not what I'd like it to be.  So I designed my own therapy to work on that! 

I started about a month ago when I tackled a task I had talked about for two years - documenting the built-in embroidery stitches on my sewing machine.  Somehow the computer images just don't tell the whole story.  Forty two six-inch squares later I have a reference file of the actual size and scale of each stitch and what a feast.  All the time I was working on these samples I was thinking about how they could be used in my work.  Even the edges of the samples were tests for various edge finishes that will work on small pieces, postcards, ATC etc.  Some are working better than others but that is what 'testing' is all about.  Because the project just involved preparing the fabric sandwiches (I stitched on a quilting sandwich because I want to see the texture added by the stitches) and setting the machine, this was a great project to reduce my frustration with not being able to work on my art.

One page in the sample book under construction

Sample book - 42 pages later

All that as an introduction to my newest project and the next step in my 'therapy'.  It's been almost a year since I have been able to do any fiber art and I find that my skills need some refreshing.   Although I was able to work at my quilt frame earlier, I am aware that my hand coordination for free motion quilting while sitting at my machine has really suffered and I am not able to work with the precision that I am accustomed to.  This is where Leah Day's website 365 Days of Free Motion Quilting Filler Designs comes into the picture.  Using the concept I developed for my sample book of machine stitches, I've started a second sample book using her patterns.  I find that when I am working on a specific piece I can never find 'the right' idea for quilting and tend to revert to the same old ones.  By actually stitching the samples I embed each pattern in my memory - although it may become buried - but the book will act as a reminder of options that I have tested.  I'll also be able to hold the sample to the piece to be stitched to make it easier to visualize the effect.  Later I'll check out some of the books in my library for other ideas.

Constructing the Sample Books

The 9-inch Square
Marking with a 6-inch Square
Digging around in my goody storage, I found two square measures, one that is 9 inches (+/-) and one that is six inches (+/-).  This has made the preparation of the 9-inch quilt sandwiches easy, and serves the marking and trimming of the stitched area to 6 inches. 

The Quilt Sandwich
Marked and Ready to Stitch
As part of my use-it-or-lose-it strategy, I joined strips of batting, salvaged from the edge of the quilts I made earlier, to make the 9 inch batting pieces and went through my stash looking for fabric (without a lot of pattern) that I probably would not be using.  The backs of the squares are actually recycled fabric.  I prepared a stack of sandwiches and then stitched an outline for the 6-inch stitching area to keep the fabric from shifting while it is being stitched.  As I reviewed each day's stitch, I made notes on a 3x5 recipe card and in a 2-inch square drawn on the card, I did a hand drawing of the stitch.  I reinforced an area on the top corner of each card with tape before punching it so that it could accompany the sample when placed on a 2 1/2 inch ring used to keep the samples together.  I document several fillers at a time and take them to the sewing machine with me as a reminder of what I am doing and include any observations I make while stitching.  Yesterday and today I have completed the first 12 and am amazed at how quickly my dexterity is improving and my confidence returning.  Thanks Leah!  Many of the designs are similar to ones I have used the past and its great to see new interpretations of old friends.